In the previous article Automation with SoapUI – Part I, we learned about various features of SoapUI for functionality testing of API services and automating test cases & creating Test Suites. However, the usage of SoapUI is not limited to Functional Testing. SoapUI has amazing abilities for non-functional testing like Performance Testing and Security Testing. One of the most important features of SoapUI for performance testing is that we can create complex functionality scenarios and then load test them. This helps test various business scenarios on different loads depending upon usage. In this blog, we will learn the various feature of SoapUI in the Performance Testing domain.


 1. Step Average – Asserts that the average value of a Test Step or Test Case doesn’t exceed the specified limit. If the average goes above the value, it fails the load test.
2. Step TPS – Asserts the Transaction per Second (TPS) value for the corresponding Test Step or Test Case. If the TPS is less than specified, the load test is failed by this assertion.
3. Step Maximum – Asserts the maximum value for the corresponding Test Step or Test Case. If it exceeds the specified Max Time, the assertion is failed.
4. Step Status – Checks the errors occurring for the specified number of executing requests does not exceed the specified error limit, else the assertion is failed.
5. Max Errors – Checks that the number of failures for the Test Step or Test Case does not exceed the configured Max Absolute Errors and/or Max Relative Errors value.
Performance Testing can be classified into various categories –
1. Load Testing – In Load Testing, the Application Under Test (AUT) is subjected to a higher load than its handling capability to test the behavior of the AUT.
2. Stress Testing – In Stress Testing, the AUT is exposed to much Higher loads than its handling capacity to test its breaking point.
3. Soak Testing – The AUT is continuously subjected to high loads for long durations, to test its reliability for higher loads.
4. Baseline Testing – Testing the AUT for the expected normal load, and check how the AUT behaves under normal load.
5. Scalability Load – AUT is subjected to rapid & sudden variations in loads to check AUT behaviour under peak loads.
A Load Test executes the parent Test Case repeatedly for a specific time with the required number of threads or virtual users. A load test can be added to a test case, by right-clicking the Test Case in the navigator panel and selecting New Load Test from the list menu. In the load test window, we can adjust various parameters like the Number of Threads, the Time Limit, Normal & Random Delay. Multiple Load Tests can be added to the Test cases and multiple load tests of multiple Test cases can be run in parallel to each other.
Testing Strategies
We can also select the strategy for the load test from the given options. These Strategies allow us to change the number of threads during execution, which allows us to change load while the load test progresses. Thus we can monitor the results, and change the load on the AUT as the Load Test executes. The data collected for the load test is shown in the Load Test statistics table and is continuously updated as the load test is being executed. The collection and of statistic data is asynchronous and independent from the actual Load Test execution, not affecting the load test directly. Let us see the load testing strategies
We can also select the strategy for the load test from the given options. These Strategies allow us to change the number of threads during execution, which allows us to change load while the load test progresses. Thus we can monitor the results, and change the load on the AUT as the Load Test executes. The data collected for the load test is shown in the Load Test statistics table and is continuously updated as the load test is being executed. The collection and of statistic data is asynchronous and independent from the actual Load Test execution, not affecting the load test directly. Let us see the load testing strategies
1. Simple StrategyIn this strategy, a specified number of threads are running with the specified delay between each run to simulate a real-life scenario for the AUT. Simple Strategy is the default strategy in SoapUI. It has two fields namely Test Delay for entering the delay time and Random field to enter random delay time. The Simple Strategy is commonly used for Baseline testing. It helps to test the basic performance of the AUT and check if there are any bad responses or embedded resource download issues. This strategy can also be used for soak testing and load testing.
2. Variance StrategyIn this strategy, the load varies over time in a sawtooth manner. There are two fields available in this field. First is the Interval field, where we can enter the period in seconds for which the variance in load will take place. Second is the Variance, that is by how much the load needs to be varied. This strategy is good for testing AUT under rapid changes in peak loads.
3. Burst StrategyIn Burst Strategy, a high number of threads are executed for a short time to simulate a burst in web traffic. This strategy is used to test the recovery period of the AUT after it breaks for the unusually high load due to the Burst load. There are two fields in Burst mode namely Burst Delay, where we can enter the period for which the Burst load is to be delayed. Another field is Burst Duration, where we enter the period for which the high load is applied to the AUT.
4. Thread StrategyIn this strategy, you can increase load linearly while the execution of the load test is on. Its main purpose is to identify on which level, statistics begin to deviate from normal behaviour and certain errors are occurring. There are two fields, Starts Threads and End Threads, where we can enter the number of the thread to start with and the number of threads to end with respectively.
Test Statistics:
In the Statistics table, we can see all the statistics related to the load test executed. There are various statistical parameters like CNT, TPS, BPS, error and many more to determine the result of the test and form a detailed report of the performance of the test case.
In the Statistics table, we can see all the statistics related to the load test executed. There are various statistical parameters like CNT, TPS, BPS, error and many more to determine the result of the test and form a detailed report of the performance of the test case.
For better visualization of test results, SoapUI provides two graphs showing results of the load test in graphical form.
~ The Statistics Graph shows all relevant statistics for a selected step or the entire test case over time, allowing you to see how values change when you increase the number of threads.
~ The Statistics History Graph shows a selected statistic value for all steps allowing you to compare them and see if the distribution of any value between test steps changes over time.
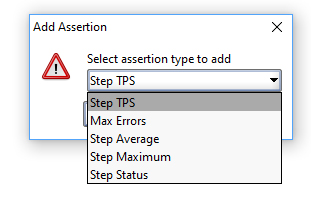
– AssertionsSimilar to functional assertions in Test Steps of a Test Case to validate the results, we can add Load Test assertions to a Load Test to check both performance and functionality during the execution of the LoadTest. The assertions are continuously applied to Load Test and can fail the Load Test just like their functional counterpart. The assertions which you can add to load test are as follows –
1. Step Average – Asserts that the average value of a Test Step or Test Case doesn’t exceed the specified limit. If the average goes above the value, it fails the load test.2. Step TPS – Asserts the Transaction per Second (TPS) value for the corresponding Test Step or Test Case. If the TPS is less than specified, the load test is failed by this assertion.
3. Step Maximum – Asserts the maximum value for the corresponding Test Step or Test Case. If it exceeds the specified Max Time, the assertion is failed.
4. Step Status – Checks the errors occurring for the specified number of executing requests does not exceed the specified error limit, else the assertion is failed.
5. Max Errors – Checks that the number of failures for the Test Step or Test Case does not exceed the configured Max Absolute Errors and/or Max Relative Errors value.
When execution of the Load Test, assertion failures are displayed in the Load Test Log. Double-clicking a log entry displays the corresponding result, allowing you to view the failed request message.
Conclusion
SoapUI provides a unique solution to many problems posed to load test your functional automation testing. The various strategies available help in testing the AUT in many different ways and scenarios. The Statistics table provide statistics which are easy to understand and interpret. And Assertions check if the load test statistics are within specified limits. For Load testing API functional tests, SoapUI definitely seems a worthy option.
SoapUI provides a unique solution to many problems posed to load test your functional automation testing. The various strategies available help in testing the AUT in many different ways and scenarios. The Statistics table provide statistics which are easy to understand and interpret. And Assertions check if the load test statistics are within specified limits. For Load testing API functional tests, SoapUI definitely seems a worthy option.
Comments
Post a Comment